NOTE: As of July 2019, I’m switching supporters from Patreon to the Tip Jar on my website: details here.
The problem with not being a talking head
Patreon says you’ll attract more subscribers if you have a video on you home page. (See here.) Creating a video is relatively easy if you just want to record yourself talking into the camera. But that doesn’t work for me: I write about art, and the most persuasive arguments for supporting me are images of the artworks I recommend.
Another issue: I can do fairly spiffy stuff with Adobe’s InDesign and Photoshop, but I’m not eager to pay monthly for Adobe’s video-editing software or spend weeks learning to use it. And before you say it: I love the Macs I use at work, but at home money’s too tight to replace my Windows 10 laptop with a Mac.
In this post, I give my work-around for creating an image-heavy Patreon video on a PC, without expensive software or a steep learning curve. I already owned Adobe Photoshop Elements; I bought a $32 mic (see below); the rest was free software. The finished video is here on Patreon, here on YouTube.
I’m particularly fond of checklists, so the must-do items below are bulleted. You can blithely ignore the rest of the comments.
1. Write a video script
If you’re juggling images while you’re trying to speak, it’s better to have at least an outline of what you want to say. Remember that your strongest lead is the unique value that you offer people, not how much you really, really need the money!
2. Create images for slides in Photoshop Elements
- In Photoshop Elements, create and save a canvas 1920 x 1080 px – YouTube’s current standard size, although they’ll let you go as high as 3840 x 2160. Under Image / Resize / Image Size, set Resolution to 300 pixels per inch, just in case you later want to print these images at high quality.
- Since white backgrounds make people (OK, me!) squint, color the canvas a neutral gray. I use hex code bbb7b7.
- Save this blank gray canvas as a PSD file so you can reuse as necessary.
- First slide: arrange images on the gray canvas. Make each image as large as possible. If the slide will only be up for a few seconds, use only one or two images – you don’t want people to be so busy trying to catch the images that they stop listening to you.
- Save the PSD image with a file name such as “01 Pareja”, so it’s easy to keep the slides in order and so that you’re reminded what you included on each.
- As much as possible, avoid adding words to your slides. When someone shows me a slide with text, I read the text – can’t help it – and the speaker loses me for however long it takes me to process those words.
- One exception: include the URL for your Patreon page on at least one slide. You want people to be able to find your Patreon page if they see the video on YouTube or social media.
- Unless you’ve taken every single one of the images you’re using, include a URL for a list of photo credits – this can be another way for people to find you. (My photo credits are here.)
- Once you’ve created all the slides you need, save the PSDs as JPGs.
- In the notes or script that you made in Step 1, add the file names for the slides (such as “01 Pareja”) in bold red. This way when you’re recording, you’ll know when to move to the next image.
3. Create slide show in Google Slides
I couldn’t persuade Windows Photos to play nice with Screencastify, so I decided to use Google Slides.
- Create a new presentation in Google Slides.
- Paste each of the images created on Photoshop to a separate slide.
- Save the presentation to Google Drive.
- Leave the Google Drive tab with your presentation open while you set up the microphone and Screencastify.
4. Set up the microphone
I did a test recording using the microphone on my laptop (a Dell Inspiron 15 5578 2-in-1). Whole words dropped out, and the sound quality for those that I could hear was lousy. So I bought two mics from Amazon: a $16 Xiaokoa that plugs into the audio / headphone jack, and a $32 Samson Go Mic that plugs into a USB.
You get what you pay for. (Surprise!) The Xiaokoa’s quality was appalling. The Samson Go Mic’s is much better, although my voice still fades if I absentmindedly turn away from the mic. But at this point, I wanted to get a “minimum viable product” on Patreon. I can do another version in a couple months, when I’ve had feedback on this version and can improve several aspects at once.
- Clip the Samson Go Mic to the top of the laptop screen.
- Plug it into a USB port. A green LED light indicates that it’s powered up.
- The Go Mic can be switched from Cardioid (icon: circle with a dent, good for speaking), Cardioid with 10dB Pad (icon: “10”), or Omni (icon: circle; picks up front and back, good for interviews). There’s a close-up of the Go Mic slider and explanations of the settings here.
- Open Voice Recorder (which comes with Windows 10) and do a short recording at each of these three settings to see which works best for you. Then set the sliding switch on the side of the Go Mic to whichever one gives you best results.
- The Go Mic has a jack for headphones, if you want to listen while you record.
5. Set up Screencastify
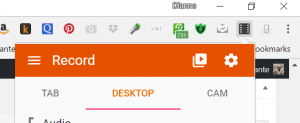
Screencastify is a Google Chrome extension, accessible at the top right of Chrome (looks like a film strip).
![]()
I use the free version of Screencastify, which puts a Screencastify “watermark” at the upper right of the video. For the time being, I’m willing to live with that.

- Install Screencastify, if you haven’t already.
- Click the Screencastify icon in Google Chrome.
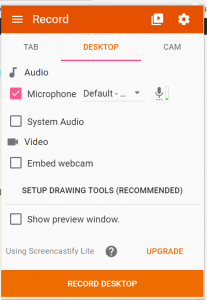
- Click the Desktop tab near top of window.
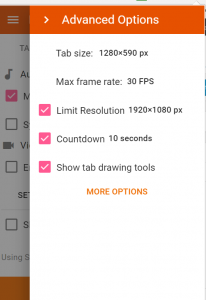
- Click the gear button at upper right and set the countdown time to 10 seconds. Click More Options to see if there’s anything else you’d like to change.
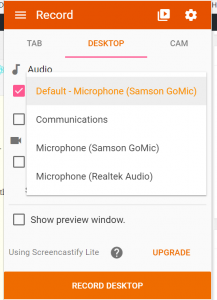
- Click the word “Microphone” and make sure the Samson Go Mic is selected.
- Click on the image of the microphone and set the slider to the vertical line (their suggestion for normal recording).
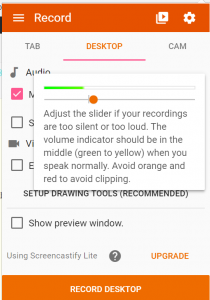
- Unclick “Show Preview Window.”
- At the bottom of the Screencastify window, click “Record Desktop”.
- A window will appear asking if you want to Share Your Screen. Click Share.
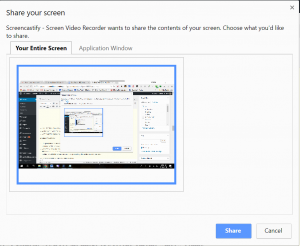
- The program will start counting down from 10 seconds … If you’ve plugged headphones into the Go Mic, you’ll hear the countdown; otherwise, you won’t.
- After you click Share, the Share Screen / Hide bar appears as a separate Chrome window. If Chrome is in your Windows Taskbar, you’ll see the image of a second Chrome window behind the first. Click Hide.
![]()
While Screencastify is counting down …
6. Begin your Google Slide presentation
- Return to the Google Slides tab in Chrome.
- Make sure you’re on the first slide in the presentation!
- Click Present toward upper right: the first image will appear full screen.
- Move your mouse off the edge of the screen and wait until the Google Slides control bar at the bottom vanishes.
- If you’re not listening on headphones, count to 10 slowly, to make sure Screencastify has had time to start recording. Nothing worse than doing a beautiful take where the first 1-2 syllables are cut off.
7. Start talking
- With the Google Presentation window active, start reading your script. Try to keep your face turned toward the Samson Go Mic.
- The Go Mic is pretty sensitive, so if you have to turn a page, move the stack of papers away from the mic to do it. If you have to cough or swallow, turn your head away and cover your mouth.
- To move to the next slide in the presentation, click the right arrow on the keyboard.
- To end the recording, click the Esc key to exit full screen. Then find the second Chrome window and click Stop Sharing.
![]()
8. Save the recording in Screencastify
- A few seconds after you stop recording, Screencastify will open a new tab in Chrome and start playing your video.
- If you’re not using headphones, disconnect the Samson Go Mic – otherwise you won’t be able to hear the playback.
- If you’re satisfied with the video, or even a substantial part of it, hit the Download icon at the upper right of the video and save to your computer.
9. Convert WEBM file to MP4 file
With the free version of Screencastify, you can only save a video as a WEBM file. YouTube will accept WEBM files, but it’s easier to edit and share MP4s. So:
- Go to Zamzar (free, no sign-in required)
- Step 1: Locate the WEBM file you just recorded.
- Step 2: Tell Zamzar you want to convert the file to MP4.
- Step 3: Tell Zamzar your email.
- Step 4: Click Convert. You’ll probably be notified that the MP4 file is ready to download within 5 minutes. Save it to your computer.
If your video is perfect, skip to Step 12. If not, re-record until you’ve got good versions of all the parts.
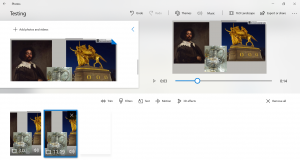
10. Trim videos and combine with Windows 10 Photos
- Make sure all your videos are in MP4 format.
- Open the Photos app in Windows 10.
- Click Create, then Custom Video with Music. You can name the video at the upper left. (This one’s called “Testing”.)

- Find the first video file. Searching for “MP4” in the search box is probably the easiest way. Click Add at upper right.
- Drag the video from the top of the window to the first of the rectangular boxes at the foot of the window.
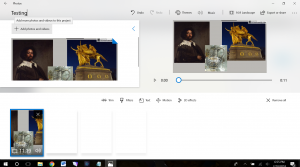
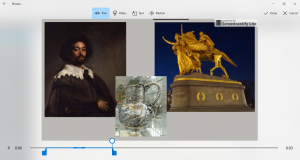
- If you need to trim the beginning or end of the video, click on the video in its rectangular box at the foot of the window: when it’s selected, it’s outlined in blue. Click the Trim icon above this row of rectangles. The Trim window opens. Play the video and note where you want to start trimming: drag the left handle there. Play the video and note where you want to stop trimming. A blue bar indicates the selection. Click Done.
- You’re back at the screen with the rectangles at bottom. To add another video, click Add Photos and Videos at upper left. Navigate to the next video. Drag it to the second of the rectangular boxes at the foot of the window. If you need to trim it, click on that rectangular box and edit as for the first segment.
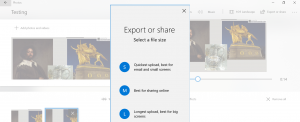
- When you’re finished adding and editing videos, click Export or Share at the upper right. Windows will let you choose the file size and will save the file to Exported Videos. You can have it show you the file in Windows Explorer.
11. Upload MP4 to YouTube
- YouTube’s instructions on uploading are here. Choose the resolution of your video, choose Public, and add a title. Having your name and “Patreon” in the title is good. This title will appear as an overlay on the video on your Patreon home page, before people click to run the video.
- As soon as the video has been processed (a few minutes), it will be available to the public.
- Copy the URL of your YouTube video.
12. Add the video to your Patreon home page
- Sign in to your Patreon home page. Above your banner, click Edit Your Page.
- The Build Your Page / Editor opens on Settings. Click the About tab.
- Scroll down to the foot of the page and paste your YouTube URL into the Intro Video box.
- Click Save Changes button at upper right of page.
- Use the button at upper left to Exit Editor.
- Your video will appear immediately at the top of your Patreon home page.
More
- Comments? Corrections? Email me (DuranteDianne@gmail.com).
- Want more art like this delivered weekly to your inbox? Members of my free Sunday Recommendations list (email DuranteDianne@gmail.com) receive three art-related suggestions every week: check out my favorites from last year’s recommendations. For more goodies, check out my Patreon page.